1. 浏览器事件
浏览器事件包括 鼠标事件(click, mousedown等)、键盘事件(keydown 和 keyup)、表单事件(submit 和 focus)、Document 事件(DOMContentLoaded) 和 CSS 事件(transitionend)
1.1 事件处理
当触发一个事件时,要分配一个处理层需,如按钮按下:
HTML 特性:
<input value="Click me" onclick="alert('Hi')" type="button" button>
DOM 属性:
<input value="Click me" type="button" button>
<script>
    let elem = document.querySelector('input');
    elem.onclick = function() {
        alert('Hi');
    }
</script>
使用 this
this 指向元素(对象):
<input value="Click me" type="button" button>
<script>
    let elem = document.querySelector('input');
    elem.onclick = function() {
        alert(this.value);
    }
</script>
1.2 addEventListener
使用 elem.onclick 方式只能添加一个处理程序,使用 elem.addEventListener() 可以添加多个处理程序。
语法:
element.addEventListener(event, handler[, options]);
- element:元素
- event:事件类型,如
onclick - handler:处理程序(可以是箭头函数、函数名或函数表达式)
移出处理程序可以使用:
elem.removeEventListener(event, handle[, options]);
举个栗子:
<body>
    <input type="button" id="btn" value="click me">
    <div style="display: none;">I'm here!</div>
</body>

<script>
    let elem = document.querySelector('#btn');
    let elem1 = document.querySelector('div');
    elem.addEventListener("click", () => alert('Hello!'));
    elem.addEventListener("click", function() {
        elem1.style.display = '';
    });
</script>
补充:一些事件只能用 addEventListener 分配,如 DOMContentLoaded
1.3 事件对象
当时间发生是,浏览器会创建 event 对象,将详细信息放入其中,并将参数传递给处理程序。
获取鼠标指针坐标:
<body>
    <input type="button" value="click me" id="btn">
</body>

<script>
    let elem = document.querySelector('#btn');
    elem.onclick = function(event) {
        alert(event.type + ' at ' + event.currentTarget);
        alert('Coordinates: ' + event.clientX + ":" + event.clientY);
    };
</script>
事件的属性:
- event.type:事件类型
- event.currentTarget:处理事件的元素
- event.clientX 和 event.clientY:指针事件的指针窗口坐标
1.4 冒泡
当一个事件发生在一个元素上,首先会运行处理程序,然后运行父元素上的处理程序,知道其他祖先上的处理程序:

<body>
    <div onclick="alert('A')">
        A
        <div onclick="alert('B')">
            B
            <div onclick="alert('C')">C</div>
        </div>
    </div>
</body>

<script>
    let elem = document.querySelector('#btn');
    elem.onclick = function() {
        alert(event.type + ' at ' + event.currentTarget);
        alert('Coordinates: ' + event.clientX + ":" + event.clientY);
    };
</script>
上面的代码中,点击 C 会依次弹出 3 个窗口:C、B 和 A
使用 stopPropagation() 可以停止冒泡:
<button onclick="event.stopPropagation()">Click me</button>
2. UI 事件
2.1 鼠标事件
事件顺序
一个用户操作可能会触发多个事件,如点击鼠标左键时,首先触发 mousedown,左键释放后触发 mouseup 和 click。
鼠标按钮
click 事件只在单击鼠标时触发,mousedown 和 mouseup 事件中可能需要 event.button,因为这两个事件在任何按键上都会除法,通过 button 属性来区分左键与右键。左键的 button 值为 0, 右键的 button 值为 1。
组合键
如果在事件期间按下了相应的键,则它们为 true。
下面的例子当点击按钮的同时,按下 ctrl + alt 时,会出现弹窗:
<body>
    <button id='btn'>click</button>
</body>

<script>
    let elem = document.querySelector('#btn');
    elem.onclick = function(event) {
        if (event.altKey && event.ctrlKey) {
            alert('ALT + CTRL + CLICK');
        }
    }
</script>
坐标
相对窗口的坐标:clientX 与 clientY
相对文档的坐标:pageX 与 pageY
<body>
    <input type="text" id='input' value="mouse over me">
</body>

<script>
    let elem = document.querySelector('#input');
    elem.onmousemove = function(event) {
        this.value = event.clientX + ' : ' + event.clientY;
    };
</script>
双击
elem.ondbclick = () => alert("click");
应用例子
实现一个类似文件管理器的点击事件:
<body>
    <p>click on a list item to select it.</p>
    <ul>
        <li>A</li>
        <li>B</li>
        <li>C</li>
        <li>D</li>
        <li>E</li>
    </ul>
</body>

<script>
    let lists = document.querySelectorAll('li');
    for (let elem of lists) {
        // 单击效果
        elem.onclick = (event) => {
            // 若此时 ctrl 未按下
            if (!event.ctrlKey) {
                let siblings = elem.parentElement.children;
                for (let sibling of siblings) {
                    sibling.style.backgroundColor = '#fff';
                }
            }

            elem.style.backgroundColor = '#acf';
        };
    }
</script>
效果如下,鼠标单击时元素背景变蓝,按住 CRTL 可以选择多项:

2.2 移动鼠标
mouseover / mouseout,relatedTarget
当鼠标移动到某个元素时,mouseover 发生,鼠标离开时,mouseout 时间发生。
当鼠标从一个元素 A 到元素 B 时,元素 A 为 target,元素 B 是 relatedTarget。
mouseenter 和 mouseleave
事件 mouseenter / mouseleave 类似于 mouseover / mouseout,它们在鼠标指针进入 / 离开元素时触发。
注意:mouseenter / mouseleave 不会冒泡
举个栗子:
<style>
    #outer {
        position: absolute;
        width: 300px;
        height: 300px;
        background-color: pink;
    }

    #inner {
        position: absolute;
        width: 160px;
        height: 160px;
        top: 70px;
        left: 70px;
        background-color: rgb(134, 224, 146);
    }
</style>

<body>
    <div id="outer">
        <div id="inner"></div>
    </div>
</body>

<script>
    let inner = document.querySelector('#inner');
    let outer = document.querySelector('#outer');
    outer.onmouseleave = function() {
        let t = new Date();
        console.log(t.getHours() + ":" + t.getMinutes() + ":" +
            t.getSeconds() + ' | mouseleave' + " target: parent");
    };
    outer.onmouseenter = function() {
        console.log('(' + event.clientX + " : " + event.clientY + ')');
        let t = new Date();
        console.log(t.getHours() + ":" + t.getMinutes() + ":" +
            t.getSeconds() + ' | mouseenter' + " target: parent");
    };
    inner.onmouseleave = function() {
        let t = new Date();
        console.log(t.getHours() + ":" + t.getMinutes() + ":" +
            t.getSeconds() + ' | mouseleave' + " target: child");
    };
    inner.onmouseenter = function() {
        let t = new Date();
        console.log(t.getHours() + ":" + t.getMinutes() + ":" +
            t.getSeconds() + ' | mouseenter' + " target: child");
    };
</script>
得到的结果如下:
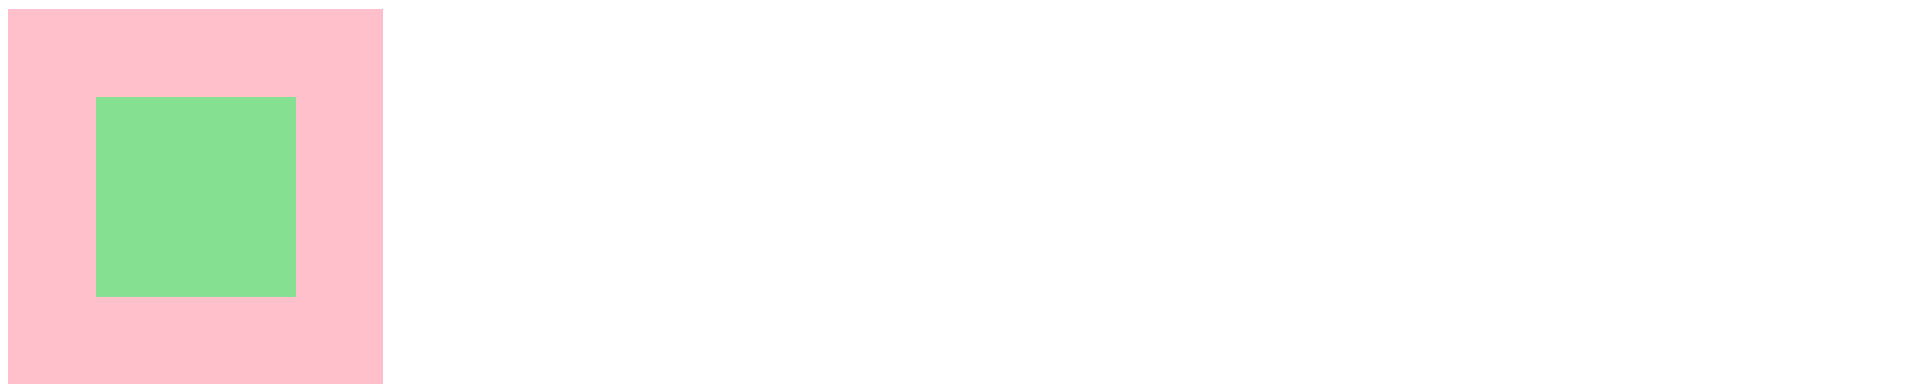
当鼠标进入 / 离开内外正方形时,可以打印当前的时间。
2.3 鼠标拖放
鼠标拖放可以看作:mousedown + mousemove + mouseup
举个栗子
创建一个滑动条:
<style>
    #bar {
        position: relative;
        height: 26px;
        width: 300px;
        background-color: rgb(192, 213, 164);
        border-radius: 6px;
    }

    #cube {
        position: relative;
        top: -2px;
        height: 30px;
        width: 20px;
        border-radius: 8px;
        background-color: rgb(96, 173, 101);
    }
</style>

<body>
    <div id="bar">
        <div id="cube"></div>
    </div>
</body>
效果如下:

添加 JavaScript 代码:
let cube = document.querySelector('#cube');
let bar = document.querySelector('#bar');

cube.onmousedown = function(event) {
    // 按下鼠标后移动滑块
    let onMouseMove = function(event) {
        if (event.pageX < 300 && event.pageX > 20)
            cube.style.left = event.pageX - 20 + 'px';
    }
    document.addEventListener('mousemove', onMouseMove);

    // 松开鼠标
    document.onmouseup = function() {
        document.removeEventListener('mousemove', onMouseMove);
        cube.onmouseup = null;
    }
}
console.log(cube.style.left);
2.4 键盘
keydown 与 keyup
一个按键事件包含了 keydown 和 keyup
查看键盘按键的 key 和 code:
document.addEventListener('keydown', function(event) {
    console.log('event.key: ' + event.key);
    console.log('event.code: ' + event.code);
});
2.5 滚动
scroll 时间允许对页面或元素滚动做出反应
看个显示当前滚动的例子:
<body>
    <p id="showScroll" style="position: fixed;"></p>
    <div style="height: 8000px;"></div>
</body>

<script>
    window.addEventListener('scroll', function() {
        document.getElementById('showScroll').innerHTML = 'Current scroll = ' + window.pageYOffset.toFixed(2) + 'px';
    });
</script>
应用栗子
创建一个长的页面,当页面下滑的距离大于窗口高度时,显示三角形,否则不显示。点击三角形可以回到顶部:
- 使用
window.pageYOffset可以获取滚动距离 - 使用
document.clientHeight可以获取页面高
<style>
    #arrow {
        font-size: 1.6em;
        color: green;
        position: fixed;
        cursor: pointer;
    }
</style>

<body>
    <div id="arrow" hidden>▲</div>
    <p></p>
</body>

<script>
    let p = document.querySelector('p');
    for (let i = 0; i < 3000; i++) {
        p.innerHTML += i + " ";
    }

    let arrow = document.querySelector('#arrow');
    window.addEventListener('scroll', function() {
        arrow.hidden = (window.pageYOffset < document.clientHeight);
    });

    arrow.addEventListener('click', function() {
        window.scrollTo(window.pageYOffset, 0);
    })
</script>
3. 表单与控件
3.1 表单属性与方法
表单是特殊的集合 document.forms 的成员,可以使用 document.forms.formName 来获取表单。
<form name="form1">
    <input type="text" name="one" value="1">
    <input type="text" name="two" value="2">
</form>
<script>
    // 获取表单
    let form = document.forms.form1;
    // 获取表单元素
    let elem = form.elements.one;
    console.log(elem.value);
    form.elements.one == form.one;	// true
</script>
注意:有时元素 name 相同,则通过 name 获取的元素是数组。
反向引用
可以通过元素反向引用到表单:
let form = document.forms.xxx;
let elem = form.elements.elemName;
elem.form	// 表单
表单元素
(1) input 和 texarea
input.value = 'hello';
input.checked = true;
(2) select 和 options
<select name="category">
    <option value="game">game</option>
    <option value="music">music</option>
</select>

<script>
    let category = document.getElementsByName('category')[0];
    // 下面的三行功能一样
    category.options[0].selected = true;
    category.selectedINdex = 2;
    category.value = 'game';
</script>
- select.options —— 表单元素的集合
- select.value —— 当前所选元素的
value
option 有以下属性:
- option.selected
- option.index
- option.text
应用例子
显示所选文本的值和内容:
<select id="genres">
    <option value="rock">Rock</option>
<option value="blues" selected>Blues</option>
</select>
<script>
    for (let opt of genres.options) {
        if (opt.selected == true) {
            console.log(opt.value);
            console.log(opt.text);
        }
    }
</script>
3.2 聚焦
focus/blur 事件
foucus 意味着输入;blur 失焦意味着输入完成
下面的例子检查用户的输入:
<style>
    .invalid {
        background-color: red;
    }
</style>

<body>
    <label>your email:
        <input type="email" name="email" id="input">
    </label>
</body>

<script>
    let input = document.querySelector('#input');
    let info = document.querySelector('p');
    input.onblur = function() {
        if (!this.value.includes('@')) {
            this.classList.add('invalid');
        }
    }
    input.onfocus = function() {
        this.classList.remove('invalid');
    }
</script>
当输入无效时会输入框背景变红,再次聚焦时背景恢复正常。
当输入无效时,也可以再次强制聚焦:
input.focus();
允许在任何元素上聚焦:tabindex
支持聚焦的元素: button, input, select, a
设置 tabindex 属性可以让其他元素具有聚焦功能:
<ul>
    <!-- tabindex="-1" 只允许以编程的方式聚焦于元素 -->
    <li tabindex="-1">One</li>
</ul>
应用例子
<body>
    <pre id="mouse" style="position: absolute; left: 20px; top: 20px; cursor: pointer;" tabindex="-1">
    _   _
   (q\_/p)
    /. .\
   =\_t_/=   _
    /   \   (
   ((   ))   )
   /\) (/\  /
   \  Y  /-'
    nn^nn
    </pre>
</body>

<script>
    let mouse = document.querySelector('#mouse');
    mouse.onfocus = function() {
        document.addEventListener('keydown', function(event) {
            switch (event.key) {
                case 'ArrowRight':
                    mouse.style.left = parseInt(mouse.style.left) + 20 + 'px';
                    break;
                case 'ArrowLeft':
                    mouse.style.left = parseInt(mouse.style.left) - 20 + 'px';
                    break;
                case 'ArrowDown':
                    mouse.style.top = parseInt(mouse.style.top) + 20 + 'px';
                    break;
                case 'ArrowUp':
                    mouse.style.top = parseInt(mouse.style.top) - 20 + 'px';
                    break;
            }
        });
    };
</script>
3.3 事件 change,input, cut,copy,paste
1. change
当元素更改完成后会触发 change 事件,对于文本框,当失去焦点时会触发 change 事件:
<input type="text" onchange="console.log(this.value)">
2. input
<input type="text" id="input">
<script>
	input.oninput = function(){
        console.log('oninput');
    }
</script>
3. cut, copy, paste
打印事件类型和获取的数据:
<input type="text" id="input">
<script>
    input.oncut = input.oncopy = input.onpaste = function(event) {
        console.log(event.type + ' - ' + event.clipboardData.getData('text/plain'));
        return false;
    };
</script>
应用例子
实现下面计算储蓄金额的功能:

<style>
    .bar {
        margin: 5px;
        float: left;
        width: 60px;
        background-color: grey;
        vertical-align: bottom;
    }

    #was {
        background-color: green;
    }

    #becomes {
        background-color: red;
    }

    #diagram td {
        vertical-align: bottom;
    }
</style>

<body>
    Deposit caculator.
    <table>
        <tbody>
            <tr>
                <td>Inital deposit</td>
                <td>
                    <input type="number" id="initial" value="10000">
                </td>
            </tr>
            <tr>
                <td>How many months?</td>
                <td>
                    <select id="duration">
                        <option value="3">03 months</option>
                        <option value="6">06 months</option>
                        <option value="12">12 months</option>
                        <option value="18">18 months</option>
                        <option value="24">24 months</option>
                        <option value="30">30 months</option>
                    </select>
                </td>
            </tr>
            <tr>
                <td>Interest per year?</td>
                <td>
                    <input type="number" id="interest" value="5">
                </td>
            </tr>
        </tbody>
    </table>
    <table id="diagram">
        <tr>
            <th id="a">was 10000</th>
            <th id="b">becomes 10000</th>
        </tr>
        <tr>
            <td>
                <div class="bar" id="was" style="height: 50px;"></div>
            </td>
            <td>
                <div class="bar" id="becomes" style="height: 50px;"></div>
            </td>
        </tr>
    </table>

    <br>

</body>

<script>
    let initHeight = 50;
    let initialVal = 10000;
    let durationVal = 3 / 12;
    let interestVal = 5 / 100;
    let becomesVal = 11250;
    becomes.style.height = (1 + interestVal) * 50 + 'px'

    initial.onchange = function() {
        initialVal = initial.value;
        becomesVal = initialVal * (1 + interestVal * durationVal);
        was.style.height = initHeight * initialVal / 10000 + 'px';
        becomes.style.height = initHeight * becomesVal / 10000 + 'px';
        a.innerHTML = 'was: ' + initialVal;
    }

    duration.onchange = function() {
        for (let option of duration.options) {
            if (option.selected == true) {
                durationVal = option.value / 12;
            }
        }
        becomesVal = initialVal * (1 + interestVal * durationVal);
        was.style.height = initHeight * initialVal / 10000 + 'px';
        becomes.style.height = initHeight * becomesVal / 10000 + 'px';
        b.innerHTML = 'becomes: ' + becomesVal.toFixed(2);
    }

    interest.onchange = function() {
        interestVal = interest.value / 100;
        becomesVal = initialVal * (1 + interestVal * durationVal);
        was.style.height = initHeight * initialVal / 10000 + 'px';
        becomes.style.height = initHeight * becomesVal / 10000 + 'px';
        b.innerHTML = 'becomes: ' + becomesVal.toFixed(2);
    }
</script>
3.4 表单事件
在表单中使用 <input type='submit'> 或在 input 输入完按下 Enter 可以触发 submit 事件:
<form onsubmit="alert('succussfully')">
    <input type="text" id="">
    <input type="submit" value="submit">
</form>